New Computer Time

As posted on the other blog, this is the proposed build if I can manage to get the parts:

ComponentCurrentNew
CPUIntel Core i7-2600AMD Ryzen R5 5600X
MotherboardAsus P8Z68-V/GEN3 ATX LGA1155MSI MAG X570 Tomahawk
Video CardRadeon R9 280Nvidia RTX 3070
MemorySamsung 8GB (2 x 4GB) DDR3-13332x G.Skill Ripjaws V 16GB (2x8GB) DDR4-3600
StorageOS is on an SSD, data is on a large ass HDDSamsung 970 Evo Plus 1TB M2.-2280 SSD
PSUCorsair 850W ATX12VCorsair HXi 850W
CaseAntec P280Fractal Design Define R6 USB-C
CoolingCooler Master Hyper 212Noctua NH-U12S

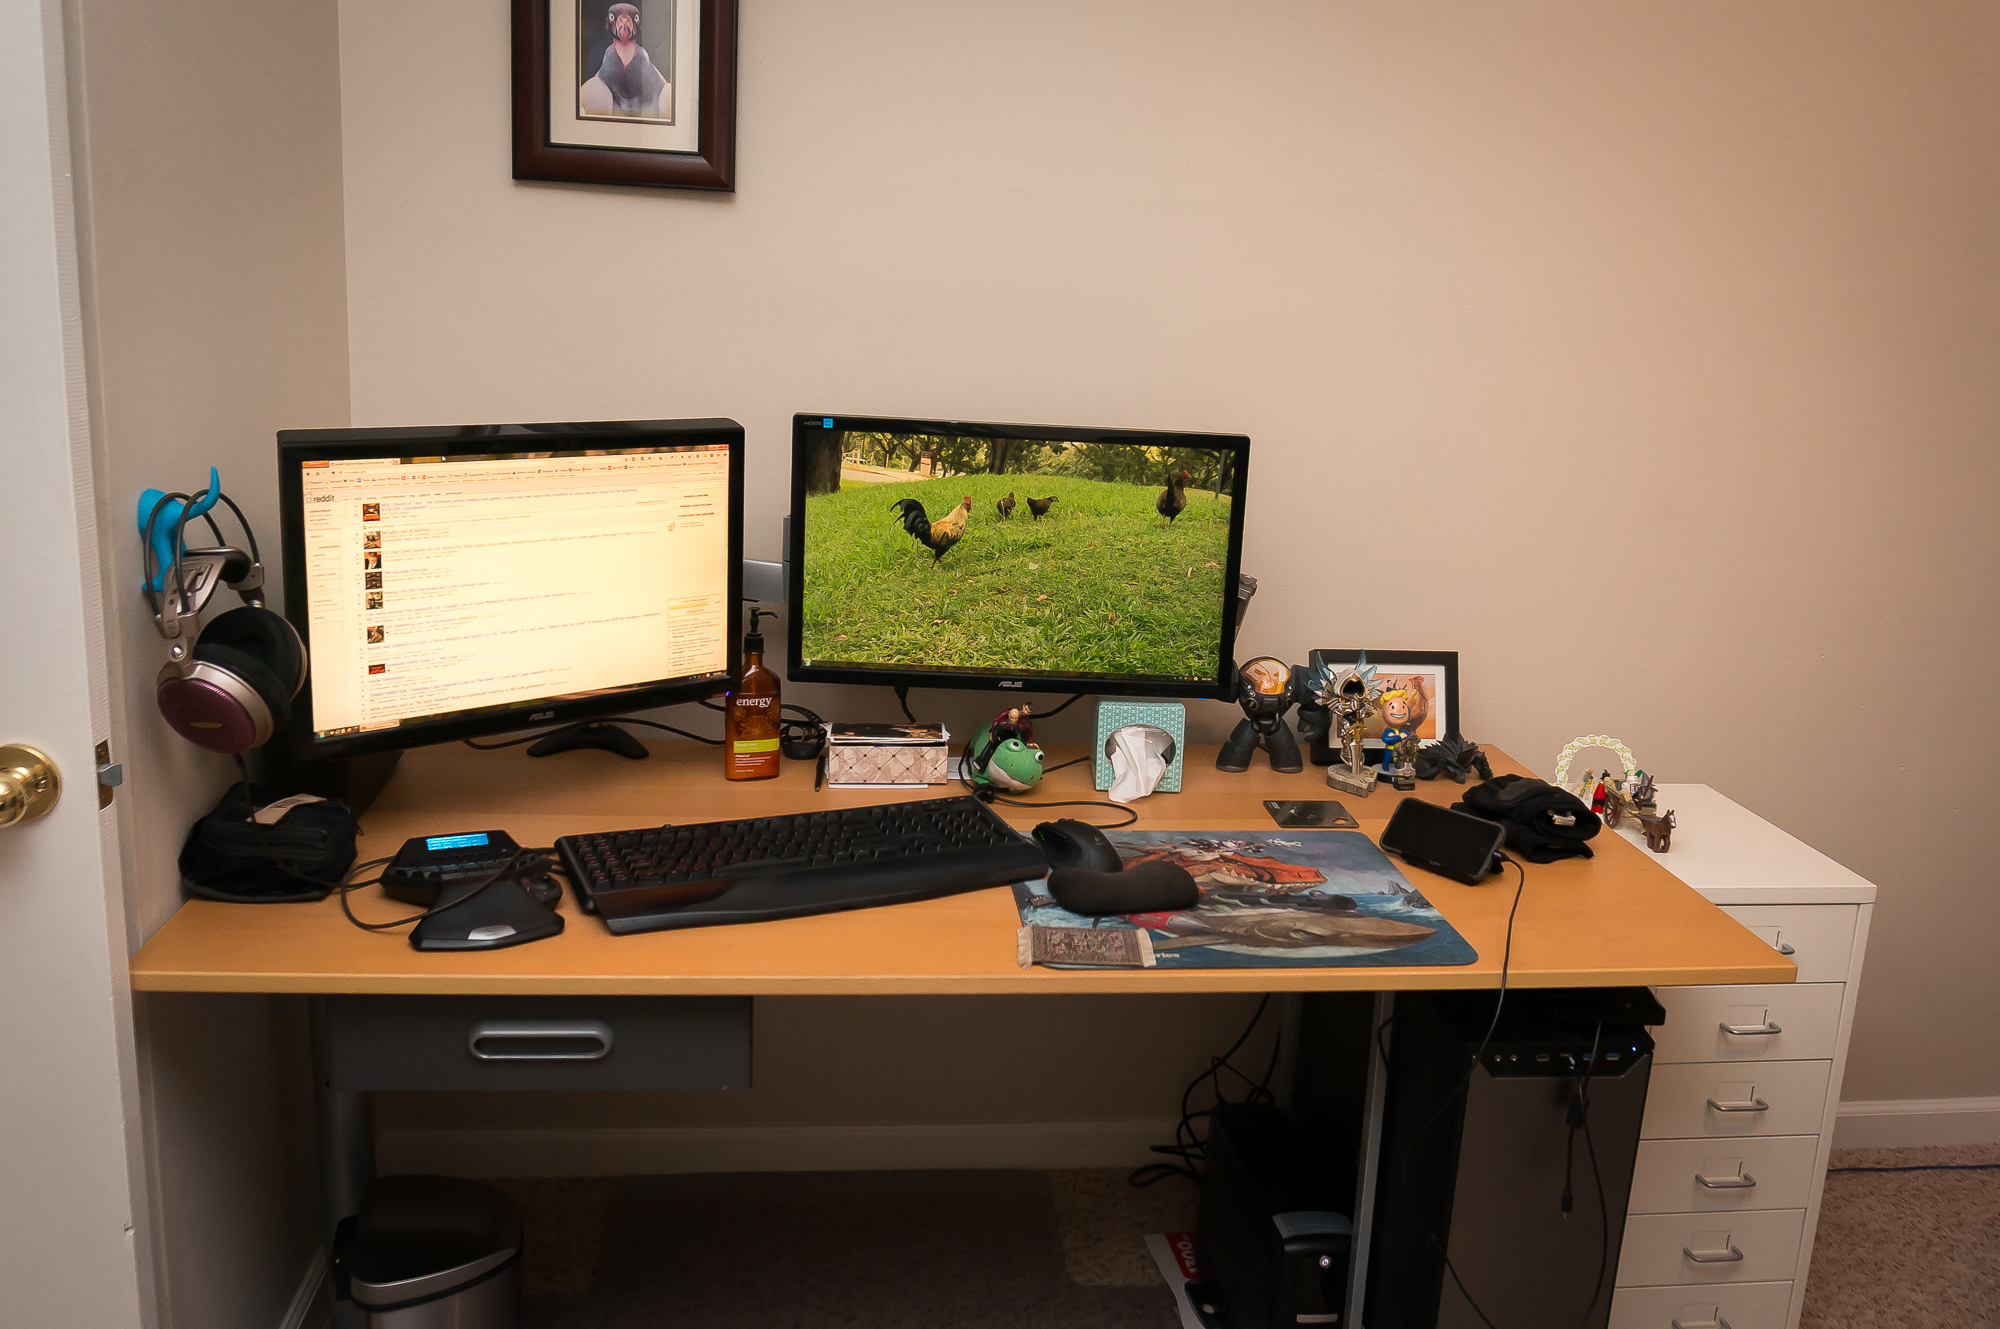
Keiya’s Battlestation: March 2015

Now that we’ve moved and have unpacked most items, I figured I should update the battlestation gallery. Same equipment as the previous battlestation photo in the gallery save for a new UPS that we picked up at Costco recently. Now that we have an actual dedicated office for the computers, the television sadly, is no longer being used as my third monitor (via Synergy). If I wish to watch TV on the actual television and not on one of the screens, I now have to walk to another room. Oh the struggle is real /sacrasm.

I am in dire need of things to hang on the wall. The picture of the vulture by the way is a family inside joke.

Keiya’s Logitech G13 WoW Setup

I have been using the Logitech G13 for roughly 4 years or so and considering it an invaluable WoW tool for my paladin. I have about a thousand keys to bind and the problem is that since I don’t have gigantic hands, I can only comfortable reach numbers 1 through 5 without having to move my left hand to the other side of the keyboard. The Logitech G13 allows me to literally access every single spell, ability, and interface option in the game while being able to move at the same time. This is the way that I have it setup:

Movement
Forward, back, strafe left, and strafe right around bound to the thumbstick on the G13. I hold down the right mouse button to look and have jump/autorun bound to the side buttons on my gaming mouse.

Action Bars
All spells and abilities in game (for the most part) are bound to buttons 1 through =. Different action bar sets can be accessed through the CTRL and SHIFT button modifiers. Generally, I have spells broken up into two rows. The bottom row 1 through 6 and the top row 7 through =.

On the board, the top row (7 through =) is bound to G2 through G7 and the bottom row (1 through 6) is bound to G9 through G14. Since I don’t have giant-ass hands, my most used spells are located in the dead middle of the board where my fingers rest by default: G10, G11, G12. Button modifiers (CTRL and SHIFT) are located on the bottom left, roughly where they would be on a normal keyboard so that my pinky can easily access them.
actionbar

M-States
One of the main advantages of the G13 is the sheer amount of stuff that you can bind to it. There are 3 buttons just below the LCD screen: M1, M2, and M3. Pressing these keys will shift the G13 into a different state allowing you to bind different items to the keys. So for example, to access a key on the M2 state from M1, you would need to press M2, press the key in question, then press M1 to shift back to the state you were in. That takes way too long.

I have a custom script setup on the G13 that you will me to momentary shift into the M2 and M3 states while the buttons next to the thumbstick are held down. So instead of having to repeatedly press M1, M2, and M3, they function similar to SHIFT and CTRL which is a lot more useful for WoW. M2 is activated by the button to the left of the thumbstick and turns the LCD red. M3 is activated by the button below the thumbstick and turns the LCD blue.

M1 (Default): Button modifiers, action bar, vent push-to-talk, screenshot, etc.
m1

M2 (Red state): The escape key, F1 through F5, and non-combat UI menus such as the guild social screen, spellbook, map, bags, rep, etcetera
m2

M3 (Blue State): Mostly the party target icons for marking things and whatever else couldn’t be fit in to M2. The ‘Aura’ buttons are a holdover from several expansion packs ago.
m3

Script for the M2 and M3 States
function OnEvent(event, arg, family)
if ( family == "lhc" ) then
if ( event == "G_PRESSED" ) then
if ( arg == 23 ) then
SetMKeyState(2, family);
end
if ( arg == 24 ) then
SetMKeyState(3, family);
end
elseif ( event == "G_RELEASED" ) then
if ( arg == 23 ) then
SetMKeyState(1, family);
end
if ( arg == 24 ) then
SetMKeyState(1, family);
end
end
end
end

An XML file containing my WoW G13 file can be downloaded below (while viewing the full post). To import it, open the Logitech Gaming Software and hit the import/export button below the profile search bar. Word of warning. This only really works with my WoW keybindings, which aren’t necessarily default.

Download

New Video Card: Radeon R9 280

asusr9280

I had originally intended to replace my aging video card (HD 6870) shortly after building my current machine about 2 or so years ago but instead, ended up holding off on that for quite some time. I guess I just never felt like it was necessary to upgrade my card, given that I have been able to run most settings for most games at high until fairly recently.

It’s not like my old card was going bad per se, but it idled at about 55 celcius, was fairly loud, and was performing below the curve; I mean, having to drop any graphical setting down to medium in order to achieve minimally acceptable framerates just isn’t right. So after a short excursion to Fry’s, I picked up an Asus Radeon R9 280 for $189. Anyway, the new card runs notably quieter, cooler, and faster than my previous card. I loaded a few games and instead of barely pushing 30 to 45 FPS on a mix of medium to high settings, I can pretty much just max everything out without worrying about dropping below 60 FPS.

As a side note, the fan intake filters on my machine apparently work pretty well. There was a surprisingly low amount of dust for a machine that sits within 3 feet of a screen door and hasn’t been opened since it was built.

Keiya’s Battlestation (June 2012)

IMG_3538

I took the liberty of tidying up my workspace for once and figured that it would be nice to take a photo for posterity. Unfortunately, my desk doesn’t really get too much cleaner that this, but whatever. So, this (top right picture) would be my current battlestation setup; And this would be both of our desks as of a month or two ago (don’t ask why the desks are colored differently…lol). Current computer specs for the machine that I built 3 months ago.

I am looking into purchasing desk mountable dual monitor arms. I have seen a few cheap options and Fry’s, but the build quality as well as the degree of articulation was a bit suspect. The arms specifically, must be able to adjust vertically since my monitor are of slightly different sizes and do not align perfectly unless I place a book underneath the right monitor. I may order these. If I do setup the arms, I guess that means I will have to cleanup all of the stuff that I hide behind my monitors…

New Computer Build: End of Q1 Edition

1361-header

We ended making a gigantic Fry’s run to build a new a computer a couple of weeks back because old faithful had been in the process of giving up the ghost for a about a year and some change. for those who are curious: It was a combination of 0x124 BSODs for hal.dll (hardware abstraction layer), random restarts, and lockups; BSODs most often with no discernible pattern other than it always occurs when I am doing something and never idle (albeit minor tasks like clicking on a link). It would choose to crash/restart about once every hour or two at the rate of about one day out of every two or three months (and then be fine for another month or two and then repeat the cycle).

As of late, the cycle has become more frequent (it was happening about once a week). I have narrowed the issue down to some piece of hardware, either the PSU or the motherboard (extensively tested everything else). I am pretty sure that it’s the motherboard that was going bad based on other issues this machine has been having. But, long story short: New computer toy time \o/. This build is what I ended up going with. Several compromises were made in interest of being able to pick everything up at Fry’s in one trip (and not having to deal with package delivery and pickup):

Component Item Price (approx)
CPU Intel Core i7-2600 3.4GHz $299.99
Motherboard Asus P8Z68-V/GEN3 ATX LGA1155 $179.99
Memory Samsung 8GB (2 x 4GB) DDR3-1333 Memory $45.00
Graphics XFX 1GB HD 6870 (from old PC) N/A
Storage Primary: Seagate Barracuda 2TB 3.5″ 7200RPM
$129.99
Data: WD Caviar Black WD1001FALS 1TB 7200 RPM (from old PC) N/A
Optical: SAMSUNG SH-S223B (from old PC) N/A
PSU Corsair 850W ATX12V $189.99
Case Antec P280 ATX
$130.00
Cooling  Cooler Master Hyper 212 EVO $29.33
Sound Asus Xonar Essence STX (from old PC) N/A

I am reusing my video card, soundcard, optical drive (HTPC has a Blu-Ray drive, don’t need one for this machine), media HDD, and two of my case fans. It is kind of tempting to pick up another HD 6870 to go crossfire because those cards do not cost too much (and just for the sake of running with two VGA cards). Overall though, I know that I am probably better off going for a single card solution. The 680 looks nice, but I don’t feel like dropping half a grand on even more computer parts independent of the fact that it is effectively sold out everywhere.

I am a pretty big fan of Antec’s Performance One case line; My previous two cases being the p180 and p182. They are great at dampening fan noise among other things but anyone who has ever worked with these cases probably knows how much of a pain in the ass they are to build with in regards the the general lack of able routing options in combination with the chamber partitioning (routing all PSU cabling through one or two holes without the benefit of a modular PSU is a small nightmare).

The p280 on the other hand was so much easier to work with. It is first of all, way lighter (by about 10lbs) due to changes with the internal design (no more partitioning or drive cages). It is a bit wider and deeper than the 183; Roomy enough to fit a long video card and route wires without any issues. For example, the SATA ports on my motherboard are located along the right edge, which would be hard to reach in most cases but easy in the 182. Also there are, at long last, cutouts that allow you to route cables behind the motherboard.

Speaking of which, I really do wish that the CPU power hookup wasn’t located at the way way top of the board. That is fine for most cases, but since the p280 has a bottom loaded PSU (though without the partitioning, good riddance), it was impossible for me to route that one cable behind the motherboard as intended.. Eyesore.

Oh also: Modular PSUs are nice. (Build photos are included below in the full post)

We learned not to forget to do a quick power on test of the board before mounting everything in the case after discovering that the original HTPC mobo was DOA…

The case interior has a nice finish. Optical drive bays (top right) are completely toolless by the way. This was about as clean and cableless that I cared to get it.

Fan wiring for the top and back fans go out through the back.

Fan speed controls are on the top right. There are two speeds: slow and fast. I haven’t noticed any significant temperature difference between the two speeds so I just keep them both on low.

Unlike the p182, all fan filters are removable. Pop it off and run it underneath the sink. Very easy to clean. Those two fans by the way, did not come with the case: The orange one, from Noctua, was pulled off of my old case. The bottom black one is a spare Scythe that I had in my pile. Both move a decent amount of air and are dead silent.

….the 5.25″ floppy drive is a tradition. It’s like the President. It’s not really Airforce One without the President.

The Apple Magic Trackpad & Windows 7

Just in case anyone else was curious, here is all of the collective knowledge that I was able to gather in regards to getting the Apple Magic Trackpad device to work in Windows 7 (64-bit in my case). It’s not really that hard, but the device seems to be somewhat finicky and just about every guide I read left out at least one critical piece of information. All of the one finger gestures and most of the two finger gestures will work on Windows 7. A compatibility chart can be found on this Apple KB Article.

I have seen two separate sets of instructions: What I typed below and another set that told me to rename the .bin file to an executable. I was able to install the drivers by renaming the .bin, but the trackpad would only function as a basic mouse without any gestures or any tapping. Anyway, the instructions below worked flawlessly for me.

  1. Download, but do not install the Boot Camp Software Update. Here are the download links for 32-bit Windows and 64-bit Windows.
  2. Extract ‘BootCamp_3.2_64-bit.exe’ with 7-zip. Doing so should create a file called ‘BootCampUpdate64.msp’.
  3. Extract or navigate into the MSP file and find the ‘BootCamp3200aToBootCamp3200’ folder.
  4. Look for the ‘Binary.AppleWirelessTrackpad_Bin’ file which is in itself yet another compressed item. Decompress the contents of this file into a folder.
  5. Look for DPInst.exe and run it.

Several things:

  • I don’t think that the trackpad will work with anything but the Microsoft Bluetooth stack. So, if you have 3rd party drivers installed, consider removing them. If you are having trouble getting the Microsoft drivers to install, this program is supposed to work: Bluetooth Driver Installer.
  • If you have the Motionjoy bluetooth drivers install, you may have to delete them manually out of the Device Manager since the drivers remain even after uninstalling the software itself. For some reason, the trackpad would only pair as a motionjoy gamepad so long as said drivers were installed. All of this by the way was occurring while I was attempting to install the trackpad on the third party bluetooth drivers, so I don’t know if there is actually any conflict at all.
  • The pairing code for the trackpad is ‘0000’.

If you wish to customize the trackpad, this program works pretty well.

HTPC Build

image_29

The build listed in the chart below is what we ended up running with for the HTPC that we built at the end of December. At long last, the dream has been realized. The ASRock motherboard that we had originally ordered off of Newegg arrived DOA, so it was RMA’d back and replaced with a Gigabyte mATX board acquired during an emergency run to Fry’s electronics.

The case we picked is nice looking, well built, and quiet, even with the dinky 70mm fans. Size wise, it’s about the size of a large DVR or VCR and fits on our console/TV crap cart perfectly. There really isn’t a whole lot of clearance between the desk drawer and the floor so height was a concern.

Component Item Price
CPU Intel Core i3-2120 $119.99
Motherboard ASRock Z68 PRO3-M Micro ATX LGA1155 (Arrived DOA)
GIGABYTE GA-Z68MA-D2H-B3 
$109.99
$124.99
Memory G.Skill Ripjaws X Series 4GB (2 x 2GB) DDR3-1600 $29.99
Graphics PNY GeForce GT 430 1GB $55.98
Storage Samsung Spinpoint F3 1TB 3.5″ 7200RPM $157.27
PSU Antec 380W ATX12V / EPS12V $44.99
Case Lian-Li PC-C37B HTPC Case $159.98
Optical Samsung SH-222AB DVD/CD Writer $22.98

I have tried most of the popular media portion solutions and honestly, all of them were either a pain in the ass to setup or didn’t really suit our needs. XBMC came close; I actually had spent a considerable amount of time configuring to play Blu-Ray Disks and ISOs (which it does not do “out of the box”), launch external applications and play Netflix.

However, loading everything using their respective normal programs ala normal computer usage works far better in our situation even though it is difficult to read small text on the TV from the couch. None of the media portals supported subtitles all that well, particularly if a video has multiple video or audio tracks. I don’t think anything other than the standard video players will allow you to easily swap subs and audio tracks (correct me if I am wrong).

We are using an Apple Magic Trackpad and one of those small Apple bluetooth keyboard to control the system. Both devices are nice looking and do not take up a lot of space, which is nice since both devices permanently live on the coffee table (certain things never get put away). Getting the trackpad to work in Windows 7 was interesting, I’ll make a separate post about that just in case anyone was having trouble getting it to work. I also have a Synergy server running off of my computer, which effectively allows me to use the TV as a third screen.

I was surprised but, that small-ass video card lets us play WoW at a relatively high video setting (my interface however, is not designed to be viewed or played from the couch, so I will need to work something out).. Most of those arcadeish steam games look and work fantastically with an Xbox controller. I need to find my ROM stash; I have about 10 to 15 gigs worth burried on an older HDD.

Proposed HTPC Build (AKA Merry Christmas to us!)

Bah, long time no post. In short: Skyrim + whatever else I was doing was so fun and engrossing that I had negleted to do anything else including signing onto WoW and posting here. I also have BlizzCon photos from 2 months ago that I keep meaning to blog about or at least post. Anyway, let’s just say that Santa was good to me this week so our self Christmas gifts year will be an HTPC a bit over my original budget ($400 to $500 originally). Using the PS3 and various software to stream videos to the TV isn’t turning out to be all that great of a solution.

Component Item Price
CPU Intel Core i3-2120 $119.99
Motherboard ASRock Z68 PRO3-M Micro ATX LGA1155 $109.99
Memory G.Skill Ripjaws X Series 4GB (2 x 2GB) DDR3-1600 $29.99
Graphics PNY GeForce GT 430 1GB $55.98
Storage Samsung Spinpoint F3 1TB 3.5″ 7200RPM $157.27
PSU Antec 380W ATX12V / EPS12V $44.99
Case Lian-Li PC-C37B HTPC Case $159.98
Optical Samsung SH-222AB DVD/CD Writer $22.98

Total:

$701.17

I really wish harddrives would go down in price. Paying that much for a 1TB drive when they were going for less than half that price a couple of months ago kind of sucks.

The Cyborg R.A.T 7 Gaming Mouse

rat7_1

My old gaming mouse was starting to circle the drain a couple of weeks ago, leading to a somewhat urgent need for a replacement. Now to be honest, I probably could have done more to verify that the issue was not a driver issue or something like that but basically: Marginally busted hardware + sufficient mad money = new toy. After a period of careful deliberation, I settled on the Cyborg R.A.T 7.

The R.A.T 7 is actually very comfortable to use over long periods of time, which is nice considering that ergonomics and extreme customizability were key marketing points. This peripheral is one solid feeling mouse, as in, it has a metal frame instead of one constructed from cheap plastic. On the other hand, The R.A.T 7’s solid construction makes it fairly heavy even with all of the additional weights removed. Keep that in mind if weight is of a concern to you. In any case, here are a couple of observations about the hardware that weren’t really stated in any of the reviews that I read. TL;DR: It’s a good mouse, I am very happy with it, though it may not suite your ergonomic needs. It’s like a pair of pants, try it first if you can.

rat7_2

For how adjustable this mouse is, the palm rest isn’t all that big and does not extend out as far as I figured that it would; Which is fine for me, being a claw-gripper with average sized chick hands, but probably not so much of you are a large handed individual. Several male cohorts have confirmed this fact. Also, when the palm rest is extended out all the way, it jiggles a bit.

The buttons are fairly wide and seem to be designed for people who prefer to use three fingers to click (middle finger being on the scroll wheel). The width is perfect for me, since most other mice are too narrow to comfortable fit three fingers. If you don’t have sausage fingers or prefer to use a mouse with a standard two fingers grip, the R.A.T 7 is probably going to be uncomfortably wide. I also like the sniper button, though I wish it were located further back on the thumb piece so that I do not have to modify my grip to press it down. The profile switch buttons is angled in such a way that it makes it hard to see. I wish it also changed the LED colors of the sensitivity bar as well.

I really like the R.A.T 7’s scroll wheel: It is flat, wider than average, clicky, textured and loose. The scroll wheel was my primary point of contention with many of Logitech’s gaming mice: Some of the scroll wheels were either too “pointy”, way way too stiff or hard to press down without accidentally activating the side-scroll feature. The R.A.T 7 is absolutely perfect.

rat7_3

Earlier versions of the mouse had some z-tracking issue that was fixed by adding a filter on newer versions of the hardware (or something like that, I don’t have the link anymore). I haven’t had any sensor or any performance issues at all, so I am assuming that the issue is fixed. Also, despite being fairly complex, I found the adjustments straightforward and easy to perform without having to dig through instructions.

We will see how durable and finicky it is. In my experience, many issues don’t crop up until at least several months to a year of regular abuse. I’ve had issues with finicky laser mice in the past (which seemed to be related to an unclean mouse surface >_>).  Performance wise, it’s smooth accurate and everything that I would expect from gaming caliber mouse.