Video Games and Storytelling

This entry was supposed to be a comment post in response to a Kotaku article that I forgot to bookmark (note to self: check phone later). It kind of went astray and turned itself into one giant thing. I am pretty sure that I am rehashing at least one or two previous posts, but I don’t feel like checking. Anyway, as I gather, video game storytelling methods fall somewhere on or between these two spectrums

  1. Open-ended storytelling: Your story is your own and it is one that organically immerses as a result of gameplay. The game provides the necessary tools and settings. In some cases, a rough direction or purpose, but your goals and what you do to achieve them are your own to decide.
  2. Linear storytelling: These games have a specific story to narrate with a very specific cast and setting. Think of an interactive book.

Most games seem to fall somewhere in the middle, probably leaning more towards being linear as most games have a fairly defined story. It’s a tricky balancing act and treading on the paper thin border between being too open and too linear is no small feat. In fact, I would say that it is one of if not the most challenging aspects of crafting a video game story. A game that is too open lacks guidance and gives way to a non-cohesive story. When you unleash players upon your world there is always a risk that they will get sidetracked and forget about the main storyline, often to the point of becoming bored and dropping the game all-together.

On the other hand, being too linear hinders gameplay. Games should be designed to be experienced and not just told. Never underestimate the importance of interactive content within an interactive game. Linear stories are a tightly kept package, everything from the camera angles to the pacing needs to be delicately crafted without feeling forced. Even so, even linear games need choices and choices need consequences. You want the player to feel like their actions have an impact on the outcome of the game, whether they really do or not. It is essentially giving the player an illusion of choices. This kind of balance is rarely found and difficult to achieve, but artful when properly executed.

Ultimately, by definition, the focus of a game should be with the gameplay. Many of my favorite games are able to integrate the narrative with the gameplay into one seamless package. Portal for example, the gameplay pretty much was the narrative. I like the recent immersion trend in first person shooters: Eliminating interface elements and integrating ammo and health meters into the game context (vision fading for health, ammo meters on the guns, etc). I mean, isn’t that kind of the point in a first person game, being able to see through the character’s eyes and all? A giant red bar along the bottom of the screen doesn’t exactly suck you into the whole experience. I also liked the Animus in the Assassin’s Creed series. It was kind of a plot gimmick, but works well for explaining away game elements.

Games in my opinion at least, have much more potential as a storytelling medium if they can ever get over their own tribulations (well, publishers). But you know what gaming really needs? I mean, REALLY needs?? Better writers. Good God.

No Eggs, No Cake

cake

I have a mild cake obsession; I can resist or just not care about a lot of things, but if free cake is offered I have to get a slice. Most people that I communicate with regularly have realized and this fact by now. To my personal delight, Cake was added into Minecraft beta 1.2. It seems to function a lot like Lightwell in World of Warcraft: It is a multiple hit healing item. You place it on the ground and it is good for 1.5 hearts x6. Most importantly though, it is a fucking cake and naturally, the first thing (well, maybe no the first) that I wanted to do once establishing myself on the new SMP server was to bake a cake.

Cooking one of these delicious treats requires: 3 buckets of milk, 2 sugar, 3 wheat and 1 egg. The milk isn’t a big deal, any one cow yields an unlimited supply; Neither is the sugar and wheat (yay indoor farming). Eggs however, I have no eggs and have not seen any all week. So thus began my egg quest. Sadly, it took a good portion of Sunday morning (and two cups of coffee) to gather all of one egg. After about an hour of wandering around the known world, searching the ground for eggs, it had occurred to me that trapping a chicken and waiting a couple of minutes was probably a more efficient gathering method.

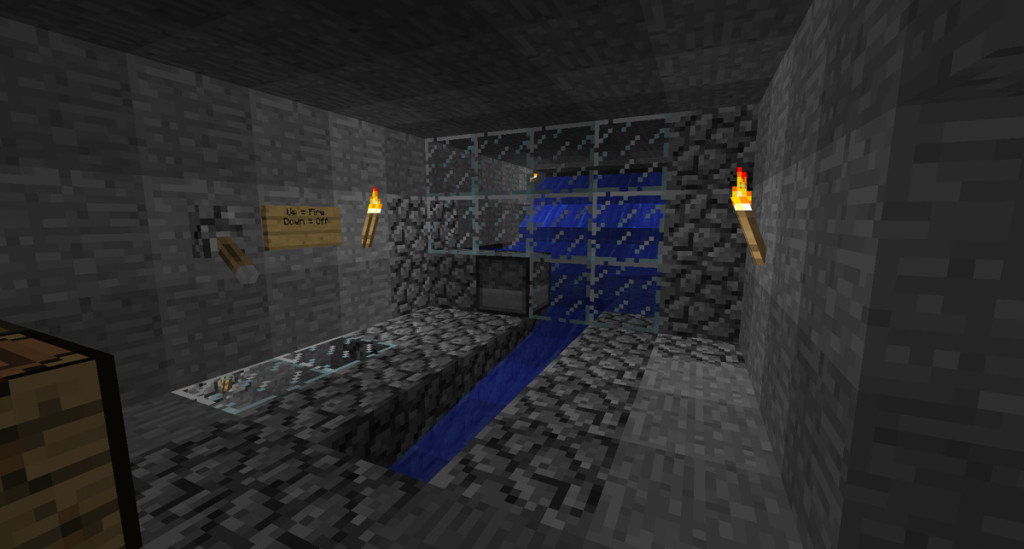
However, one egg isn’t good enough. Nothing short of an elaborate egg farming mechanism was good enough for the sake of future cake baking. So that started the next project: An egg farm. The plan is to load the eggs into a switch operated dispenser that would shoot them into a glassed off pool. Chickens would pop out of some of those eggs and lay more eggs. The water currents within the glassed off area would carry the eggs to a safe gathering point. Today I learned two things about constructing dispensers. Both should have been obvious, but I haven’t delved into Minecraft in a while. If I recall correctly, pre-Beta was when I set the game aside to fixate on Cataclysm.

  1. You need to use a pickaxe to destroy a dispenser if you want any hope of reclaiming it. If you punch it, it is gone. The dispensers are a little bit finicky to place, it randomly turned the other direction twice. In the process of repositioning them, I had accidentally punched one to death. I had used my only bow to construct it was out of string. So I had to go wandering around in the middle of the night searching for spiders. When I accidentally destroyed the second dispenser, I rage spawned another bow on the server console.
  2. The dispensers don’t autofire by default; I thought they did. Press the button once and one item pops out. If you want the dispenser to function as a rapid fire turret, you need to connect a series of rapid pulsers. Ugly wiring.

2011-02-20_20.52.10

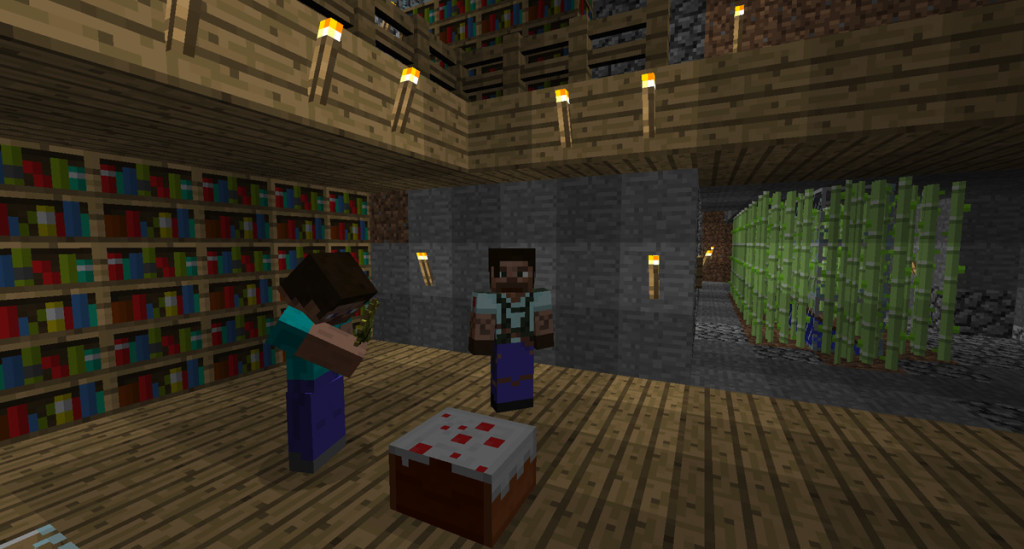
This is a screenshot of us, enjoying floor cake together.
2011-02-20_20.34.43

Here’s a nice map of the server thus far. Tertiary Base is coming along nicely, despite minor creeper setbacks. I’ll post about it once the library and tree farm are complete.

Keiya’s SMP Minecraft Server

image_24

My latest “project” has been a dedicated SMP Minecraft server. For the time being, the server is running off of a 512 Linode slice. If I recall correctly, general internet consensus pins the minimum memory requirement for a Minecraft server at around 1024MB; For two people however, 512MB should really be fine. In theory. My stupid map generator seems to increase my CPU usage by quite a bit, but nothing too bad. I will see how the server holds up. Not that it matters, seeing as how there’s probably only going to ever be two people online at a time max >_<. If I find a cheaper game server host I may switch service but I’ve been very happy with Linode and enjoy having full control over the server.

Oh, Mr. You Know Who (If you are reading this): I have a tertiary base not too far from Base Site Beta. It used to be fairly hidden, but should be fairly obvious now, with the outdoor reed farm, glass exterior and all. There are a couple of goodies inside of it as well. PS: Please don’t blow it up with a creeper. I did that already earlier because I was watching TV. The glass is a pain in the ass to redo.

KeiUI 4.0 Info & Download Link

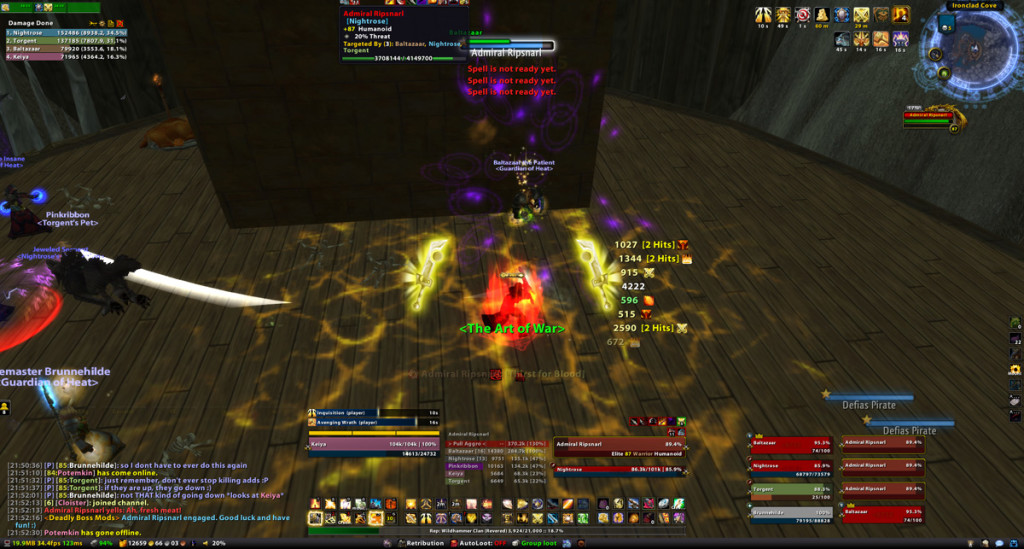
A couple of people have requested my UI setup, so here you all go; Many apologies for the uuuh delay lol. A full description of KeUI is included in this post. This interface has been exclusively designed for and used on a 1920×1080 windowed setup. It should however, still work properly with any windowed 16:9 ratio screen resolution.
KeiUI-4-Party_0

As a word of warning, I don’t play anything else other than Keiya most of the time so my interface is very retribution paladin centric (though I am looking into more class generic addons to replace things like Holytrinity and clcret). If anyone else uses a Logitech G13 and is interested in how I bind everything in accordance with my G13 profile, the keybindings configuration files are included within the WTF folder.

Installation Instructions
I sanitized all of the addon profiles as best as I could. After a fresh install, the correct profiles for each mod should load without having to fuss around with Reflux. If you want to use your Config.wtf file, just make sure to set the following values:

SET gxResolution “1920×1080″”
SET gxWindow “1”
SET uiScale “0.76999998092651”

Aside from that, setup is standard fair. I have included general instructions below; If you need more assistance, Tankspot has one of the better guides that I have seen in regards to uploading, downloading and configuring custom UI setups.

  1. Please please please make sure to backup your original Interface, WTF and Fonts folders. Both are located within your World of Warcraft root directory. Either rename both of these folders to something like, WTF_OLD or create a new folder and move them into it.
  2. Download the .zip file attached to this article and extract it into your World of Warcraft directory. The .zip file should contain three folders: Interface, WTF and Fonts.
  3. The following folders within the WTF folder will need to be renamed: YOUR_ACCOUNT_NAME, YOUR_SERVER_NAME and YOUR_CHARACTER_NAME to your login name, server name and character name respectively.
  4. Login to WoW. At the character selection screen click on the “Addon” button located on the lower left. Click the checkbox at the top labeled, “Load out of date addons.” All of the major addons included within my UI compilation should be fairly recent, but I can’t guarantee how often this .zip file will be updated.
  5. Load your character and enjoy.

List of addons
The list of visible addons are included below.

  • Bartender 4
  • Chocolate Bar
  • ClassTimer
  • CLCRet
  • HolyTrinity
  • MikScrollingBattleText
  • Omen
  • OmniCC
  • oRA3
  • Pitbull4
  • Prat 3.0
  • Recount
  • SexyMap
  • SimpleTankFrames
  • TidyPlates
  • XPBarNone

If anyone has a request or configuration question, I would be happy to address them in this thread or via email when I have time.

Download

My Logitech G13 WoW Setup

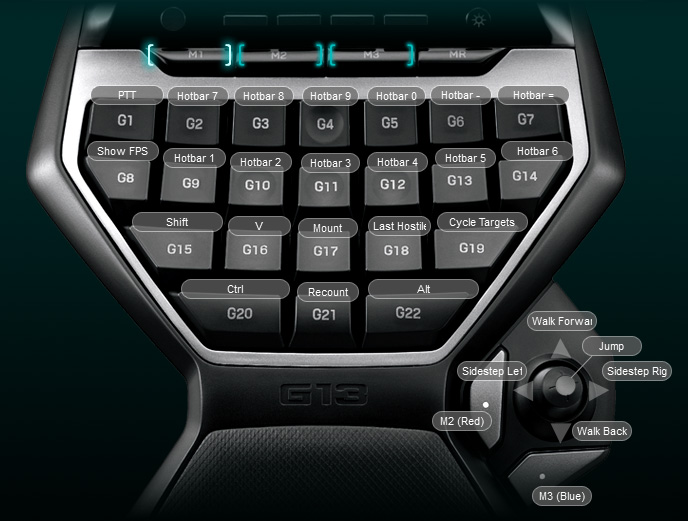
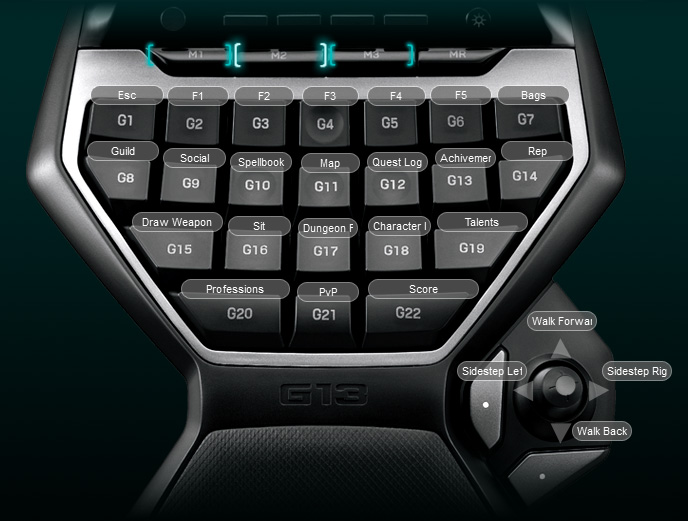
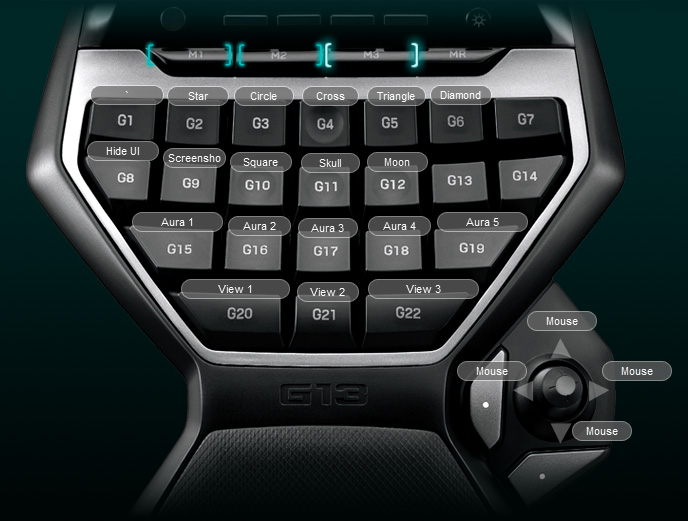
I have my Logitech G13 broken down into three different states: M1 (default), M2 (red) and M3 (blue). By default the gamepad will always be in the M1 state. However, I have the Logteich software setup to allow me to momentarily shift into M2 and M3 while I have the two buttons below the thumbsticks pressed down. That way, I don’t have to manually press the M2 or M3 buttons at the top of the keypad to access any of the red or blue buttons. The colors by the way, correspond to the LCD backlight coloring for each state as well as my N52 setup. This is generally how I tried to organize each of the three states:

M1 (Default): Frequjently used items, combat abilities and regular shift modifiers (Shift, Control and Alt)
M1

M2 (Red): Blizzard interface elements such as the guild screen, map, professions as well as party targets (F1 through F5).
M2

M3 (Blue): Raid icons, auras, screenshotting, camera views and other stuff.
M3

The new gamepad software, version 6, will allow you to assign a button that will toggle you into any of the M states by right clicking on a button and going to Edit > Fuction. If you are using the old software, version 3.0.6, you will need to add a script  (included below). FYI: I have G23 assigned to M2 and G24 assigned to M3. If you prefer another configuration, that shouldn’t be too hard to change.


function OnEvent(event, arg, family)
if ( family == “lhc” ) then
if ( event == “G_PRESSED” ) then
if ( arg == 23 ) then
SetMKeyState(2, family);
end
if ( arg == 24 ) then
SetMKeyState(3, family);
end
elseif ( event == “G_RELEASED” ) then
if ( arg == 23 ) then
SetMKeyState(1, family);
end
if ( arg == 24 ) then
SetMKeyState(1, family);
end
end
end
end


Keys G9, G10 and G11 are where I naturally rest my ring, middle and index fingers. I tried to keep important abilities centralized around this area. It’s worth noting that, to avoid any possible EULA violations, I don’t use the G13 to script anything that couldn’t already be macro’d in game. I have quite a few items bound to awkward key combinations in game (Shift + Control + F1 to toggle Recount for example). Not so easy to press on a normal keyboard, trivial to bind on a gamepad. Also, I have jump, autorun and 4 or 5 other things bound to my mouse.

If anyone is interested, my configuration file is included in the zip file posted below. Beware, it’s highly customized to my awkward in-game keybindings…